Showing posts with label Distressing. Show all posts

2.07.2012

Work With What Yuv' Got


Ok, before you begin, I highly suggest you listen to A Minor Swoon on Spotify while reading. Thanks Caroline!
Click on the picture above to listen if you don't have Spotify, but seriously, get Spotify.


As many of you know, we've been working to renovate our master bathroom for almost two years. Yes you read that right, two years! I'm not ashamed of it or embarrassed to admit the reality of the situation (well, not at this moment anyway). This is life, and I'm a real person, this blog was never meant to make something of myself, my home, or my family that it's not. 
I hope there's someone out there that reads that and feels a sense of relief from it. Maybe you've been stuck in the middle of a project for what seems like a lifetime. Maybe you're constantly putting unnecessary pressure on yourself to accomplish something.
I enjoy making something new out of a space or an object in our home when there are no added "musts" and "have to(s)".
There are times when you get stuck. Our bathroom is one of those times. But, my good friend Amy once told me something like this "just put a curtain up and close it off, then work on the rest of the space that you can actually have some control over, make that what you want it to be."
In other words, work with what yuv' got!


So...it only seemed logical to give our other bathroom a facelift! That was something I could accomplish. Paint, check. New shower curtain, check. Repaint accessories, check. Spend birthday money on great things to make it even better, check!!

I painted the room in one evening. Although it's hard to tell with the bad lighting, the new color, Cypress Grass from Glidden, adds a lot more color and brightness to the small room. I've been wanting to use this color ever since I saw it in this laundry room from House of Smiths.


Today I wanted to show you want I did with these metal frames purchased from Pier1 in my college days...
Notice the paint swatches :)

I decided almost all the accents in the bathroom would be white, so I got my primer and white flat spray paint, coated each.


Then, I used my Distress Ink to highlight the details on each frame and to add a little shabbiness. 
When you use Distress Ink for a project like this just rub the pad directly onto the surface you're working with. Distress Ink is found in the scrap booking section of most craft stores. We've only got Michael's close by and that's where I got mine.

I removed the glass (After searching high and low for chalkboard spray paint to use directly on the glass) and cut craft wood to fit in its place. The wood was painted with black chalkboard paint, and I'm seriously considering painting over these with brown chalkboard paint, but we'll see. I originally thought I wanted to keep the leaf idea, so I had my dear friend Kristin chalk-sketch some leaves before I so selfishly erased them...sorry Kristin!

Because I decided I wanted words instead of images. These lyrics from Drew Holcomb & The Neighbors' Live Forever came to mind. I'm not sure how I feel about it though....I literally wrote something about sanity on the walls of a very small bathroom........It could be neat to constantly change.

Come to think of it, these lyrics are perfect right now! Sometimes Steven and I just have to laugh at the state of our master bathroom to keep our sanity!

I'll be updating you with advancements in our lil' bathroom...soon to be my favorite room in the house, and only room that is officially re-DONE.

Also, check out my friend Jamie's new blog Spare Time & Seersucker...her ideas are lots of fun and super cute! You can get a sneak peak of her cute spaces here.


7.13.2011

Porch Sign from Pallet Wood


Our front porch has been looking pretty bland, and with yard work on hold due to lack of funds, hot weather, and really, more important things to do, the whole front of our house is now in desperate need of some help.
I really wanted something decorative to hang to the left of the front door, but didn't want to end up spending a whole lot for whatever it is I would find.
Then, I got an idea to make my own sign with the lyrics "Home is wherever I'm with you" from the song Home by Edward Sharpe & The Magnetic Zeros. You can listen to it here.
I thought I could put this whole thing together using some wood from a pallet Steven found for me...Gotta love free lumber scraps!!


He volunteered to cut the pieces I needed...thank goodness, because being 8 months pregnant, I don't have a lot of motivation to hold a heavy circular saw!

Once the pieces were cut it was time to paint them...

Then I sanded down the edges to add some distressing later on...

Then I got to designing the text on the Silhouette. I used the font Lullaby on dafont.com.

Here's the vinyl transfer process:
Clockwise from top left:
1. Vinyl is placed face down on sticky transfer paper.
2. Excess vinyl is peeled off of the transfer paper.
3. Transfer paper with remaining letters adhered is flipped over and centered on wood.
4. Transfer paper is removed, leaving vinyl letters behind.
(For a more in depth look at using vinyl with the Silhouette click here.)

Phew, I got the vinyl transferred to the wood with no problem and added distress ink to the edges.
For in depth information on using Distress Ink click here.

I then coated the sign with a clear coat of spray paint, which will hopefully keep everything together and safe while hanging outside.
Lastly, I stapled some sisal rope behind the sign pieces to hang it with. I like the added touch of tying two knots and fraying the ends of the rope, I think I was inspired by the rope shelves I recently made.

Success! The best part about this whole project is that it cost me nothing. I had everything on hand, yay! I can't wait to get this on the front porch! I need a masonry drill bit first...

I'm linking up with the following:


6.17.2011

Cheap Changes to Picture Frames

I received these two fantastic prints from the Etsy shop Chasing the Crayon and finally got my hands on some cheap frames for them. Michael's had these guys on sale for $4.99, I could not pass them up! The frames came in a variety of colors, but none of them fit the shabby/rustic look I was going for. 
I decided on two plain black frames.
They were too contemporary and clean for my taste, but I thought I could change that with a little bit of ivory paint and a paintbrush. I just barely dipped the brush into some paint and dabbed it on a rag until it was super dry. Then I very lightly painted the frame.
And here they both are with these super cute prints, looking more rustic.

And for another next to nothing change for a picture frame, try using spray paint and Distress Ink like I did with this one.
It used to be a teal and gold color(sorry I didn't take pictures during). Distress Ink can be found at Michael's or any other craft store on the scrapbooking aisle. The color I used here is called Walnut Stain. I love using it! Sometimes it's nice to sand whatever you're distressing first, but with this frame, I just rubbed the ink pad against the frame and it picked up the ink in natural looking places. 

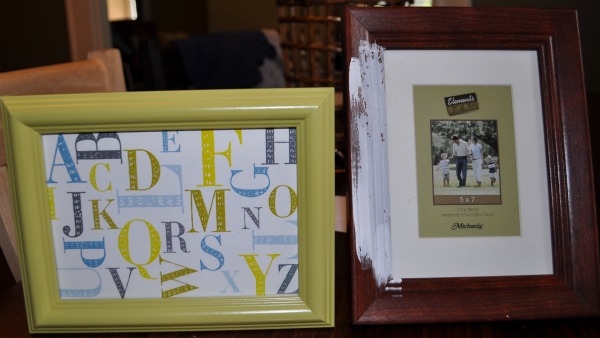
Sometimes you just need some color...I had two cherry stained picture frames that I had tried to paint white, but the paint wouldn't stick to the frames' finish, so I gave up, thinking I wouldn't be able to use them. But, spray paint did not let me down this time!
The frame on the right is what both looked like, you can see where I stopped trying to get the white paint to stick.
First, I primed the frame to make sure the Avocado color would stay. Did you know Valspar has tons of their paint colors available in spray paint? I didn't until a few days ago!
Then it was just about two coats of paint and 20 minutes and I had a brand new piece of decor for the nursery!
Download this alphabet print for your own project here.
Never pass up a good deal on picture frames...anything can be done with a little paint and dry brush, or some spray paint and distress ink! Also, a great places for cheap frames are thrift stores...I don't think I've ever been to a thrift store without seeing a shelf full of different frames.
My husband left for a wedding in Memphis today, so after a late night of some seriously annoying heartburn, I slept in, and now am contemplating my day. Maybe I'll check out this enormously huge antique store in Elizabethton for a new bathroom mirror? 
Happy Friday everyone!

1.10.2011

Shelves: Saved & Distressed

Remember these shelves I got back in mid-December while thrifting?
Before
The only word I can think of when I look at these is grimy, but with potential! I liked how they looked very stable and put together & the details on the edges I thought made them unique. I didn't like how they're a type of plastic and they looked like it! I also didn't like the weird yellow color.

So! Finally after almost a month I got started on giving these guys a makeover!
First, I painted multiple coats of white acrylic paint to each. This proved much more difficult than spray paint, but considering my circumstances, I stuck with the ol' brush.
Then, I used my handy sandpaper sponge (as seen in my picture frame turned tray post) and distressed the edges, corners, and along the details.
This is what the shelf looked like after new paint and some sandpapering:

Wasn't quite right! Because of the light yellow color underneath, the sandpaper distressing method wasn't enough to bring out the details and really make these shelves look like I wanted them to.
So, I got brave and used my Distress Ink (in Walnut Stain) for the first time!
This stuff is great and you can find it at Michael's for about $5 in the scrapbooking section.
I applied the ink pad directly to the shelf, being careful to stay on the outer edges and raised details.

After that I used a rag to smooth the ink out and take off any excess that lingered around.

And here's the end result!
After
Much better right? Now my bare dining room walls are gaining some ground!
Don't stress, distress! (Yea, I thought of that one on my own.)

I'm linking this up with WhisperWood Cottage's 1st Project of the Year Party!!
And Remodelaholic!