Showing posts with label Upcycled. Show all posts

4.18.2012

Up off the Counter


One day long ago I went to a thrift store and bought every single metal candlestick they had. At less than $1.00 a piece why not? At the time I had absolutely no idea what I was going to do with them, only that I had just been introduced to the wonders that spray-paint can accomplish so I figured I'd give them new life with color.


Then Pinterest happened (yes, I've had these candlesticks for that long). And when I found this fruit/cupcake tiered stand, I knew exactly what I would use my candlesticks for!
Mary Janes & Galoshes
Here's what my collection had become, minus a few that I've already converted to useful items.

Candlesticks have been a cinch for me to find. The pie tins are another story-maybe I just don't know where to look, and I suppose you can buy them brand new; I've found four without looking too hard, and they've all been purchased at antique or thrift stores. My first step is placing tins on top of sticks until I've found that perfect match up for what I had in mind.

I spray painted the candlesticks a shade of blue, the pie tins I gave a white coat, and then I used an odd sort of metal putty called SteelStik that completely hardens after a while and secured the pieces together. The guy at Lowe's advised me to use this.
This metal glue stuff STINKS. It smells just like this town called Sulfur Springs in Texas that I used to drive through on the way to Tennessee. I was hilariously amused to read the packaging where it stated that this stuff is from none other than....Sulfur Springs, TX! Sorry to anyone out there reading who has a love for this East Texas town...

So here they are, painted, stuck, and dried.

I'd planned to use the big tin to hold hand soap, lotion, and a dish brush to keep next to the kitchen sink. The smaller tin was the perfect size for bar soap for the bathroom sink. 

I also laid a doily at the bottom of the larger tin just for something extra and I found a teensy porcelain bowl for the dish brush to sit in so it'd look fancy and wouldn't drain onto the doily or spray-painted surface.


I love how everything is contained together, just how it would be directly on the counter, only somehow this elevated dish makes it look cleaner....and gives me back that little bit of counter space.

Next, I'm definitely going to make a tiered piece for my jewelry, and eventually I'd love to make something for fruit and to have on hand for little treats or cupcakes at a party. Something like this...

So there you have it, a creative way to get your necessities off the counter but still at arm's length!


8.02.2011

Recreated Old Door

Somehow Steven and I ended up with this old door...there was once upon a time that we snagged about 4 doors in one swoop at an abandoned house that was about to be demolished, but we can't remember if this door was found there, or if it in fact was used inside our home at one point. Either way, we have a thing for old doors, but this is the first time we've upcycled any of them.

I first got the idea for this project from this picture than I found on Pinterest:
Via Apartment Therapy
Right away I knew I wanted to recreate this idea for Finn's room and I already had the perfect door waiting on me in the shed!
So I set to work....first, I power sanded this monster.

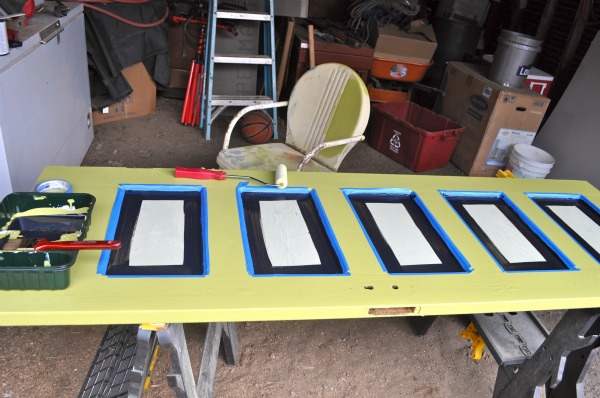
Then I used a sponge roller brush and started painting the door with New Avocado by Valspar, the nursery's accent color.

After having a bad run in with magnetic paint(it was one big block of solid, I couldn't stir it worth anything!), I decided to just go for chalkboard paint for the panels. And to make life easier, I taped off each section to get clean lines.

After the painting was all finished, Steven pointed out that there were lots of paint bubbles and that I should scrape them and give it another coat of paint....well, after scraping, I liked the imperfect chipped look, so I decided against throwing on another coat and left it as is. I'd like to think that this had more to do with taste than it did with laziness, but either way!

Then it was time to recruit the husband to do the hard part and hang it up for me!
He screwed two screws into the back, with a heavy duty wire wrapped around each screw.

Then he found the center of the wall and hung the door from its wire on a wall-mounted screw. 

Mom and I found these super cute owl hooks from Hobby Lobby, so I had Steven hang those as well..

I love Hobby Lobby, especially for their cheap prices, and these hooks were total Anthropologie knock-offs. I had been eyeing some from Anthro that were about $12 a piece I think. I got these little owls for about $2.99 a piece...however...it is important to remember that Hobby Lobby is cheap for a reason! Both hooks popped straight off these guys as soon as Steven had them screwed on tight..

I guess my husband is just too strong ;)! Well, I'm not too disappointed, you really cannot beat that price, and these are more for looks than function. Maybe a little wood glue? They look alright without hooks too I think.
I had a little fun with the chalk and here's the finished project as of now!

I'm thinking about adding a hanging rod along the bottom for some extra storage, we'll see how much energy I can muster!
After all that Steven needed a nap with Bear...

And Banjo just kept looking as cute and confused as ever!