Showing posts with label Painting. Show all posts

2.07.2012

Work With What Yuv' Got


Ok, before you begin, I highly suggest you listen to A Minor Swoon on Spotify while reading. Thanks Caroline!
Click on the picture above to listen if you don't have Spotify, but seriously, get Spotify.


As many of you know, we've been working to renovate our master bathroom for almost two years. Yes you read that right, two years! I'm not ashamed of it or embarrassed to admit the reality of the situation (well, not at this moment anyway). This is life, and I'm a real person, this blog was never meant to make something of myself, my home, or my family that it's not. 
I hope there's someone out there that reads that and feels a sense of relief from it. Maybe you've been stuck in the middle of a project for what seems like a lifetime. Maybe you're constantly putting unnecessary pressure on yourself to accomplish something.
I enjoy making something new out of a space or an object in our home when there are no added "musts" and "have to(s)".
There are times when you get stuck. Our bathroom is one of those times. But, my good friend Amy once told me something like this "just put a curtain up and close it off, then work on the rest of the space that you can actually have some control over, make that what you want it to be."
In other words, work with what yuv' got!


So...it only seemed logical to give our other bathroom a facelift! That was something I could accomplish. Paint, check. New shower curtain, check. Repaint accessories, check. Spend birthday money on great things to make it even better, check!!

I painted the room in one evening. Although it's hard to tell with the bad lighting, the new color, Cypress Grass from Glidden, adds a lot more color and brightness to the small room. I've been wanting to use this color ever since I saw it in this laundry room from House of Smiths.


Today I wanted to show you want I did with these metal frames purchased from Pier1 in my college days...
Notice the paint swatches :)

I decided almost all the accents in the bathroom would be white, so I got my primer and white flat spray paint, coated each.


Then, I used my Distress Ink to highlight the details on each frame and to add a little shabbiness. 
When you use Distress Ink for a project like this just rub the pad directly onto the surface you're working with. Distress Ink is found in the scrap booking section of most craft stores. We've only got Michael's close by and that's where I got mine.

I removed the glass (After searching high and low for chalkboard spray paint to use directly on the glass) and cut craft wood to fit in its place. The wood was painted with black chalkboard paint, and I'm seriously considering painting over these with brown chalkboard paint, but we'll see. I originally thought I wanted to keep the leaf idea, so I had my dear friend Kristin chalk-sketch some leaves before I so selfishly erased them...sorry Kristin!

Because I decided I wanted words instead of images. These lyrics from Drew Holcomb & The Neighbors' Live Forever came to mind. I'm not sure how I feel about it though....I literally wrote something about sanity on the walls of a very small bathroom........It could be neat to constantly change.

Come to think of it, these lyrics are perfect right now! Sometimes Steven and I just have to laugh at the state of our master bathroom to keep our sanity!

I'll be updating you with advancements in our lil' bathroom...soon to be my favorite room in the house, and only room that is officially re-DONE.

Also, check out my friend Jamie's new blog Spare Time & Seersucker...her ideas are lots of fun and super cute! You can get a sneak peak of her cute spaces here.


9.24.2011

Talented Friends|Beautiful Gifts


I wanted to share these amazing gifts we received from great friends with you all...and while you're reading you should listen to this.

Peter created a leafless birch tree to bring to the hospital with us so each guest could add a thumb print leaf to the branches. I am so thrilled with how it turned out with the bright green leaves added. It looks like something straight out of a children's book. The type of children's book that adults enjoy just as much, if not more. Know what I mean?
We got this idea from our friends Chris and Christie's wedding...they did this instead of a guest book. Isn't it lovely?!


Then Kristin created a pair of paintings with verses from Psalm 127 across each.


These foxes are my favorite!

And here they are together, side by side. I love how the trees match Peter's birch!

These pictures really don't do this artwork justice. We have such amazingly talented friends and are so blessed that they wanted to create something for Finn!
All in favor of these two opening up Etsy shops?

And just for kicks...Finn is already practicing to be a superhero. Check out how he busts out of his swaddle flexing his muscles:

And there's a first for everything...
And Finn slept for nine hours straight last night. Can I get a heck yeah?! He gets 4 oz. of Dr. Pepper through a bottle nipple for that one! ...only kidding.

7.14.2011

Thrift Store Retro Chair meets Front Porch

Some time way back in December I picked up this chair in need of some major tlc. Then cold weather came and took away my motivation. 
Finally I got this guy out of the shed, dusted him off and went to work making him pretty again!
Here's the before & after:


Here's the progress after some power sanding....


Then I sprayed on a good coat of primer.


I used up some more of Valspar's New Avocado spray paint. I tend to rely too much on neutrals, so this was a big step for me! Normally, I probably would've gone with white, or something pretty plain, but now our front porch will have a pop of color! And my sign got hung already and I am loving it! Only downside...this song has gotten stuck in my head every time I see this sign. Woops.

There is still a ton of work to do to our porch. I'd love to get out there with a pressure washer and repaint the floor....someday! I've also got a new wreath in the works and we definitely could use some potted plants! Maybe I could even construct a small side table out of pallet wood? Hmmmmm...

 I'd love to incorporate something like this:
Via Under the Table and Dreaming

Any curb appeal/front porch ideas? Inspiration?
I'm linking up with...


7.05.2011

DIY Rope Shelves & Chalkboard Paint

I couldn't wait to complete this project as soon as I saw it! The tutorial is super easy to follow, material costs aren't too steep, and the shelves look amazing! 
There's no need for me to reiterate any of the how-tos for making these shelves, just check out this link if you're interested in making your own!
I got the husband's help again for this part...and can I just say, I love tools! There's seriously a tool for everything out there!

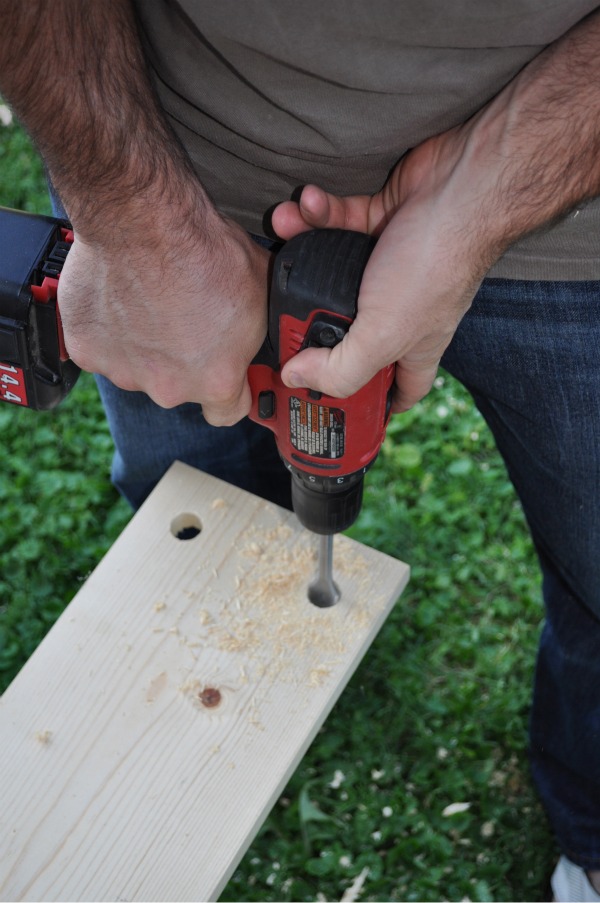
Once I gathered all the materials and had the lumber, dowel rods, and rope cut at the hardware store, I got my sweet husband to help me drill the holes.
You will use a 7/8 spade bit to drill each hole.


Then I was ready to paint!


Using a mini roller brush worked the best for painting the shelves.

Here I am feeding the rope through the shelves.

And a close up of the dowel rod pieces that hold the shelves in place...

All done! And hanging on a towel hook while I step back and admire!

Then I moved the shelf into the nursery onto the newly painted chalkboard wall!

It was my first time experiencing with chalkboard paint. I decided to paint a whole wall.

The paint goes on looking navy and eventually dries black (or whatever color you purchase).

And just two coats later and it's all done! After being stored in a crammed space for a week, the rope shelf could use some straightening out...

And this guy got placed in his new home above the nursery door!

We're getting closer to an entire nursery reveal! Hang tight, hopefully it won't be too much longer!
I hope everyone had a wonderful Independence Day!

6.29.2011

DIY Milkglass

If you've got a little bit of extra time and paint on your hands and would like to change up some glass bottles or jars you have lying around then this is the perfect project...
I originally got this idea from beach house in the city. Hers turned out fabulous and inspired me to try it for myself.
Via beach house in the city
I started with a couple of plain glass bottles...here's a hint: search for unique glassware at thrift stores rather than antique stores to save some money. Antique stores have very unique (and old) medicine bottles, etc. but they can cost up to $5 or more each! I like to snag something for more around $.75 and thrift stores will rarely let you down if you're searching for glass (or picture frames).

I used a beige paint and a plain white acrylic paint for these bottles. Once I gather more glassware from thrift stores I plan on having a plethora of white and cream colored bottles.

First, add a little bit of water to your paint. I mixed the paint and water in a plastic cup until it reached the right consistency. You don't want the paint to end up too watered down or it will run.

Then you will pour your paint mixture into the bottle and swirl it around until it is entirely covered. You'll know if you've added too much water if the paint tends to run down the sides and pool in the bottom rather than clinging to the glass really well.

Before and After

Beach house in the city explains this important fact, so keep this in mind:
"because i use laytex paint, i can't fill these with water and put flowers in them. solution? next time you buy real flowers, collect the little stem water containers or purchase some from a florist. now you can enjoy your bottles with single blooms."


I plan on making a small shelf above our dining room doorway to place these lovelies on either side of our At Table sign.

6.21.2011

Chair Redo

This winter I picked up a chair from my favorite antique store for $15.00. I was looking for something that would be an easy first time reupholstery project, but would look completely different when finished.
I bought this chair before we knew we were pregnant and I wasn't quite sure what colors and fabric to choose because I didn't know where the chair would end up.

First, I removed the upholstery...a yucky green plastic seat cover existed underneath.


After choosing to make this chair a part of the nursery, I decided to use some fabric from the quilt I'm making for the nursery to cover the chair cushion. Reupholstering a chair of this design is super easy. All it takes is fabric the right size, folded tight and stapled underneath with a staple gun and lots of staples. With new fabric the chair was already worlds different!

Then, it was time to paint the chair! I found Valspar's New Avocado spray paint in satin and thought it would match the fabric and nursery color scheme perfectly!
I primed the chair first.

Then sprayed it with New Avocado until the can went dry!

Here's the new and colorfully improved chair! All set to add a dash of color to the nursery.


Before and After: