Showing posts with label Nursery. Show all posts

9.24.2011

Talented Friends|Beautiful Gifts


I wanted to share these amazing gifts we received from great friends with you all...and while you're reading you should listen to this.

Peter created a leafless birch tree to bring to the hospital with us so each guest could add a thumb print leaf to the branches. I am so thrilled with how it turned out with the bright green leaves added. It looks like something straight out of a children's book. The type of children's book that adults enjoy just as much, if not more. Know what I mean?
We got this idea from our friends Chris and Christie's wedding...they did this instead of a guest book. Isn't it lovely?!


Then Kristin created a pair of paintings with verses from Psalm 127 across each.


These foxes are my favorite!

And here they are together, side by side. I love how the trees match Peter's birch!

These pictures really don't do this artwork justice. We have such amazingly talented friends and are so blessed that they wanted to create something for Finn!
All in favor of these two opening up Etsy shops?

And just for kicks...Finn is already practicing to be a superhero. Check out how he busts out of his swaddle flexing his muscles:

And there's a first for everything...
And Finn slept for nine hours straight last night. Can I get a heck yeah?! He gets 4 oz. of Dr. Pepper through a bottle nipple for that one! ...only kidding.

9.12.2011

We're So Crafty We Made a Person...& Now We're Raising Him


Finn is four weeks old today. It's hard to believe that he's been in this world soaking up everything new for the first time for almost one month! He must be learning a lot. He makes it kind of obvious that his brain is on overload by the furrowed brow he almost constantly wears.
I have no parenting advice, but I do know that each day I enjoy him more and more. The more I enjoy him, the more I feel like a mother. I like feeling like a mother. My words sound like a bad grade-school paper, but it's difficult to express all the changes that have and are taking place in life, inside me, my husband, and our family. It's hard, but it's a challenge we'd never pass up.


Just a week after Finn was born, my best friend Caroline came in town to meet him and help me out. She took a handful of amazing first pictures of Finn and snapped some of his room while she was at it too. I had planned to do an overall nursery reveal, but, things don't always occur in the order you'd always expected, and truthfully, the nursery isn't "how I want it" for a full reveal. Who knows when it will be!
But, I do love his room and wanted to share some highlights with you.

This quilt was handmade by Steven's great grandmother for his father and it'll keep getting passed down. The Mr. Fox animal was a gift from Aunt Caro! And the chair we got discounted from TJ Maxx because there was slight damage to the backside, sweet!

Across the length of the chalkboard wall I wrote the first few sentences from chapter two of Fantastic Mr. Fox by Roald Dahl. It reads, 
"On a hill above the valley there was a wood. In the wood there was a huge tree. Under the tree there was a hole. In the hole lived Mr. Fox and Mrs. Fox and their four small Foxes."
For a tutorial on this rope shelf go here.

The bird mobile we made hangs above the crib. You can just barely make out the tops of the two pillows I purchased from etsy tucked in the corners and above on the wall hangs the two prints I created that you can download and print here.
The bedding is from Auggie...yes! Finn's Gram(Steven's Mom) got us the pieces I had been swooning over for months!
The gorgeous crib was a gift from my parents, GranDooks and GranWubbs (I'm really hoping these grandparent names stick).


This tiny owl was brass before I spray painted it glossy white and the alphabet print I created on Publisher. Download & print it here if you're interested!


This faux bear skin rug was a wedding gift for my husband(kind of an inappropriate inside joke) and found a home on the back of our couch for the past year. I thought it fit in perfectly with the theme of Finn's room, so we moved him into the nursery.

And there's the old door hanging above the changing table. Finn gives this thing the death stare every time he gets his diaper changed, if he's in a good mood. I take that as a compliment, it must be interesting!

And then there's the deer head, hanging out above the door.

Finn's crying...that's my cue!

8.02.2011

Recreated Old Door

Somehow Steven and I ended up with this old door...there was once upon a time that we snagged about 4 doors in one swoop at an abandoned house that was about to be demolished, but we can't remember if this door was found there, or if it in fact was used inside our home at one point. Either way, we have a thing for old doors, but this is the first time we've upcycled any of them.

I first got the idea for this project from this picture than I found on Pinterest:
Via Apartment Therapy
Right away I knew I wanted to recreate this idea for Finn's room and I already had the perfect door waiting on me in the shed!
So I set to work....first, I power sanded this monster.

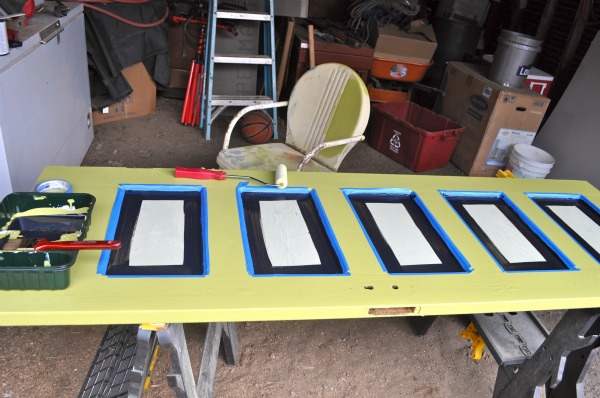
Then I used a sponge roller brush and started painting the door with New Avocado by Valspar, the nursery's accent color.

After having a bad run in with magnetic paint(it was one big block of solid, I couldn't stir it worth anything!), I decided to just go for chalkboard paint for the panels. And to make life easier, I taped off each section to get clean lines.

After the painting was all finished, Steven pointed out that there were lots of paint bubbles and that I should scrape them and give it another coat of paint....well, after scraping, I liked the imperfect chipped look, so I decided against throwing on another coat and left it as is. I'd like to think that this had more to do with taste than it did with laziness, but either way!

Then it was time to recruit the husband to do the hard part and hang it up for me!
He screwed two screws into the back, with a heavy duty wire wrapped around each screw.

Then he found the center of the wall and hung the door from its wire on a wall-mounted screw. 

Mom and I found these super cute owl hooks from Hobby Lobby, so I had Steven hang those as well..

I love Hobby Lobby, especially for their cheap prices, and these hooks were total Anthropologie knock-offs. I had been eyeing some from Anthro that were about $12 a piece I think. I got these little owls for about $2.99 a piece...however...it is important to remember that Hobby Lobby is cheap for a reason! Both hooks popped straight off these guys as soon as Steven had them screwed on tight..

I guess my husband is just too strong ;)! Well, I'm not too disappointed, you really cannot beat that price, and these are more for looks than function. Maybe a little wood glue? They look alright without hooks too I think.
I had a little fun with the chalk and here's the finished project as of now!

I'm thinking about adding a hanging rod along the bottom for some extra storage, we'll see how much energy I can muster!
After all that Steven needed a nap with Bear...

And Banjo just kept looking as cute and confused as ever!

7.26.2011

Burlap Letters


I fell in love with these burlap letters the first time I came across them on The Virginia House.
You will need:
-Letters of your choice. The ones I used have a tough cardboard consistency and were purchased from Hobby Lobby. I loved how they were more masculine than many letters you see.
-Mod Podge or Elmer's Glue
-Canvas or burlap fabric
-Paint & roller brush or sponge brush.
-Marker
-Good fabric scissors


First outline your letters with a marker onto the fabric and cut inside the marked line somewhat so that the burlap doesn't hang over the letters' edges.

Then mod podge or glue the fabric onto your letters.

The next part just adds an extra touch. These letters look great covered in burlap, but to give them a little something else, lightly paint over the burlap with a cream or ivory color.


Such a quick and easy project for something different to add to letters!

My mom came in for the weekend and we had a blast together! We even managed to add some color to the front porch, I'll update you soon...plus, the nursery is coming together, carpet was installed on Monday so I've been nesting away! I cannot wait to show you, Steven and I love his room so much we spent all afternoon with the doggies in there!

7.20.2011

DIY Alphabet Blocks

Well, here I am, 36 weeks pregnant and covered in poison ivy! The best way to forget about this poisonous plant's irritating effect is to stay busy....
So! Yesterday I kept my mind off how itchy I was by creating alphabet blocks for Finn's room.


My inspiration came from these fabulous blocks I found on Etsy for $32.oo.
Via Tiny Giraffe


I started off with 1.5" wooden blocks from Michael's for about $1.50 a piece. I also thought you could purchase a piece of post lumber from Lowe's or Home Depot and cut it into cubes as well (I can't take credit for that idea, it was totally my husband!).

I painted each of them ivory using a sponge brush-so much better than a paint brush.

For the block lettering I used the font Toskanische Egyptienne Initialen from dafont.com. 
I love being able to cut adhesive vinyl from the Silhouette SD, but I have to tell you, I really struggled at first getting acquainted with how it all works. 
After toying with inch after inch of vinyl I realized that the only way I can get my machine to cut vinyl properly is using the blue knife cap, a speed of 1, and a thickness of 1. Anything faster or thicker and the blade would slice straight through the vinyl and the backing, resulting in a huge disaster.

I also had to learn the hard way that you load the vinyl roll directly into the machine, rather than cutting the appropriate length to load.
And don't be discouraged if the vinyl gets jammed while you're trying to load it, it usually takes me 3-4 tries before it finally feeds through. Just take it out, smooth it down and reload it. Eventually you'll be good to go!

Here I'm peeling off the excess vinyl from the transfer paper:

Since this font is so detailed, I had to use a sewing pin to take off the unneeded vinyl, leaving behind the skinny outline of the letter. Here's what the letter N looks like as it's stuck to the transfer paper:

Then I press the letter, vinyl side down, onto the block and smooth it over. The transfer paper is then removed, and yahoo! it worked!!

At this point I was already so proud of the outcome, but I wanted to add some Distress Ink to the edges and then seal them up so they last a good long time.

I love this stuff!

And here they are! I think I'm pretty proud of them! The only letter missing from this set is M. For some reason, the Silhouette couldn't take all the detail and never cut that letter quite right. Oh well, it'll be our secret!
The distress ink ended up drying more gray than brown, which I am totally fine with!
I'm going to have too much fun spelling random things out of these blocks...and even though they can't spell mom, because the M is missing, I made sure that words like dad, sly fox, and Finn would be possible! And forest, of course.

Even if you don't have a Silhouette or other cutting machine, you could definitely still make these guys with stickers or paint lettering on freehand or with stencils. Isn't this a great idea for something to pass on for generations?


Now if only this poison ivy would go away! (Can you imagine being in labor while covered in red, itchy, oozing bumps?!...me neither, because it's not gonna happen!)
I'm linking up with...