Showing posts with label DIY. Show all posts

9.25.2012

Using Words on Walls

A while back, I created a print with the verse "Eat, friends, drink, and be drunk with love" from Song of Solomon 5:1. Click here if you're interested in using this print in your home (just be forewarned that there is a slight grammatical error, and someone just might convict you of promoting cannibalism).
I decided to give those words new life by changing up the way I displayed them in our dining room and here's the end result!
Originally I had this print displayed with its earth tones before the color invasion happened.
I suppose I left out a very important comma because that font style didn't have one available, whoops! It's great when it takes something like Pinterest publicity to realize the mistake you made...
Onto the project!
First, I inserted scrapbook paper into each frame that I'd picked from my random stash and laid them on the floor in the design I had pictured for the wall.

Then I took the frames out back and spray painted each of them white.

Next, I hung them up, trying to keep the design intact without using any guidelines.
After I got them hung up, they stayed wordless for a few months until I had a chance to get the Silhouette SD out. I used the font hoedown found on dafont.com (my favorite!).

Here's a look at what used to take up that little bit of wall space:
I love this idea! Breaking up a short quote or verse onto different objects for display is a cheap and easy way to decorate a wall of any size. Take advantage of the free print I mentioned earlier, or start your own project using this same verse, perfect for a dining room! Just remember, don't eat your friends.
Allison

9.19.2012

A Homemade House

After selling our television over the summer I finally had a fireplace mantle free to decorate. Mantelpieces are probably my most favorite focal point of a home, and I almost immediately search for the fireplace in anybody's house...even the houses that I walk by in the neighborhood (can you say creeper? Whoops.) 
I'm pretty happy with our mantle as it sits right now and can't wait to have something to change over the seasons and holidays.


From left to right:
-Reader's Digest Best Loved Books collection- $6.00 for 12 books (the missing book is stashed on top of Steven's nightstand). I'd love to find the rest of the books so we have a complete set.
-Pair of framed vintage cross-stitch victorian silhouettes-a gift from my Aunt Pam who inherited them from my Grandmother and Grandaddy. We'd like to hope that they were made in the family, but no one knows for certain.
-Chalkboard- created at home from lumber pieces and paint.
-Persimmon canisters-IKEA! For about $12.00 (I think) and full of sticks from the backyard.
-Robin's egg bunny- free from a friend trying to get rid of some things. I gave him a new coat of spray paint.

My new style tastes have taken over our whole house. I think it began in the kitchen and just sort of spilled over. I'm putting color wherever I can, dreaming about the perfect afghan granny square blanket, wishing I could cross-stitch, and becoming more and more "granny-chic".


Allison

6.16.2012

Flower Garden Twig Fence


Today I finished my little garden fence! 
I originally saw this idea in Parents magazine and then had the idea to plant flower seeds and create this fence in a bed behind our house. I talk about my plans for this here.
I started off gathering sticks on one of my morning walks with Finn from a random pile of branches at the side of the road.
I tried to get around the same height and thickness.
Then I picked my paint colors and spread the painting project over numerous days and movies. I usually love multitasking while watching a movie.
I purchased some nylon twine from Lowe's in the diameter I thought would work best. Anything thicker and I think it would've made the twigs move too much.
The directions in the magazine said to use a rubber mallet to get the sticks in the ground, but I just pushed them down into the soil very gently. I broke two sticks overall, not bad!
I thread the twine through the twigs in a in front & behind tactic and switched each piece of twine so they'd be opposite.
This was a fun little project that wouldn't take long at all to accomplish, especially if you painted the twigs only one or two colors rather than a pattern with four.

Now, I hope I have some luck with the flowers growing and blooming! 
Here's some Zinnia sprouts, so we're getting somewhere!

Allison


6.06.2012

Tablecloth turned curtain panels

On the second floor of an antique mall in downtown Jonesborough(the oldest town in Tennessee) is a booth full of old embroidered tablecloths & napkins, piles of doilies and other dainty knick-knacks. This is my favorite place to go to find sweet patterned fabrics...it almost never lets me down.
I found this tablecloth with a pattern I adore. The border is my favorite part, and the colors are perfect! 

I brought it home and cut it in half using my rotary cutter....
Notice the porch surface? This happened before we painted our porch....so glad we got that done!
The cut wasn't perfect, but I knew I'd be sewing the edges eventually because I had decided to turn this tablecloth into new curtains for our kitchen window!
I originally was looking for a quilt top, which is probably terribly hard to find, to use for curtains like in this lovely home...

Seriously, I love everything about this home. I think it's the reason my tastes have started to change.

I used the sewing machine and talent of my friend Jamie during one of our craft nights and started hemming the edges and leaving enough room across the top for the curtain rod.

During this process, I realized that I need to ease up when it comes to sewing....I had an awful experience with mine about a year ago and have sworn to never touch it again....anytime a sewing machine makes an odd sound or even the slightest jam and I get anxious. Jamie was a good encouragement and watching how fast she zips the fabric through was exactly what I needed. It was so simple! It took about 20 minutes from the time we started ironing the edges to completed curtains.

I got them hung up above the sink and I am so happy!


For holdbacks I found these beautiful knobs from Hobby Lobby and spray painted them Olive Green.

Then I added a little something extra to the center of the window.
I had this oval frame with no glass so I decided to string a strip of fabric through it and cut out some scrapbook paper, adding a few words I need to remember while washing the dishes.
Anytime I needed text on a project before I got the Silhouette, but didn't trust my own handwriting with a paintbrush(which is pretty much always) I would use these rub-on letters.

They are pretty amazing, and look almost exactly like they came right out of a typewriter.

Then I spray painted another hook I had at the house and hung it below the words for a dish rag or towel to hang.
Sorry about the picture quality, these were taken at night, since it's the only window in the kitchen, I just couldn't get the lighting right. But here's a peak at how they look during the day when the sun shines through...

For a pair of new curtains I paid $8.00 plus the cost of some white thread for Jamie's sewing machine. Win!

Before:

After:

If your response to this change is something like "wow that window looks a lot more old-ladyish" then we're on the right track. I'm going for more old-fashioned (old lady) charm.

PS. This is what happens when you take a pee-break and allow your crawling son to continue venturing on his own around the kitchen when you have the dishwasher door open....

He got stuck. Why is it called child-proof when we alter our homes in order to keep our kids safe? I think this photo is proof enough that we have a child! Just kidding mom, I'm working on it!

Allison

5.31.2012

Planting Flowers & Doily Bowls

There are a lot of things I have never done before. Planting seeds that will grow into flowers is one of those many things. There's a slight chance that I did something like that in my childhood that I can't remember, but thinking back, the only flower-planting I can remember included putting an already bloomed something into the ground.
Today, on our morning walk, Finn and I went to Mize's Farm & Garden, which is about three blocks away. While I perused the seed packet aisle, I had an old man go on and on about his sons who were 6'5 and 300 something lbs. Arms that are "this big around" while placing his hands in a circular fashion....Finn and I loved it!
We picked up three seed packets since $7.00 was all I brought and I didn't want to go overboard and then be embarrassed when we had to put one back because we didn't have enough money....
The winners were...Zinnia, Purple Coneflower(Echinacea), and Poppy(Oriental Orange Scarlet).

I plan on planting the seeds in this bed behind the house...I only hope it gets enough sun!

Then I would love to make a little fence like the one below that I saw in June's issue of Parenting magazine...

I also wanted to share a quick project I tried out from Pinterest. Just a doily, a bowl, fabric stiffener, and rubber bands...and you've got a doily bowl!

Mine was a little lop-sided and I'm still not sure why the fabric stiffener made weird thin coats over the doily holes, but all in all I was impressed with how easy this project was and thought that it'd be a really cheap and easy way to make lots of bowls for a themed party or wedding.

Happy start to summer everyone! I hope you get lots of chances to sit in the sunshine this week!
Allison

5.18.2012

DIY Painted Twig Letters

Lately I have been a color enthusiast. I'm having a hard time reigning in my thoughts on how I can bring more color into every room of our house, specifically the dining room. Our living room has curtains with lots of color, our kitchen is a hodge-podge of blues, yellows, greens, and reds...but our dining room has been a dull mix of gray, green, white, black and gold.
First, I took down the curtains (which I still love) and replaced them with the curtains in Finn's nursery which are a white sheer with jute strung through.
This helped...there was now a lot more light coming through the windows, and I got rid of color boundaries and opened the room up to endless possibilities.


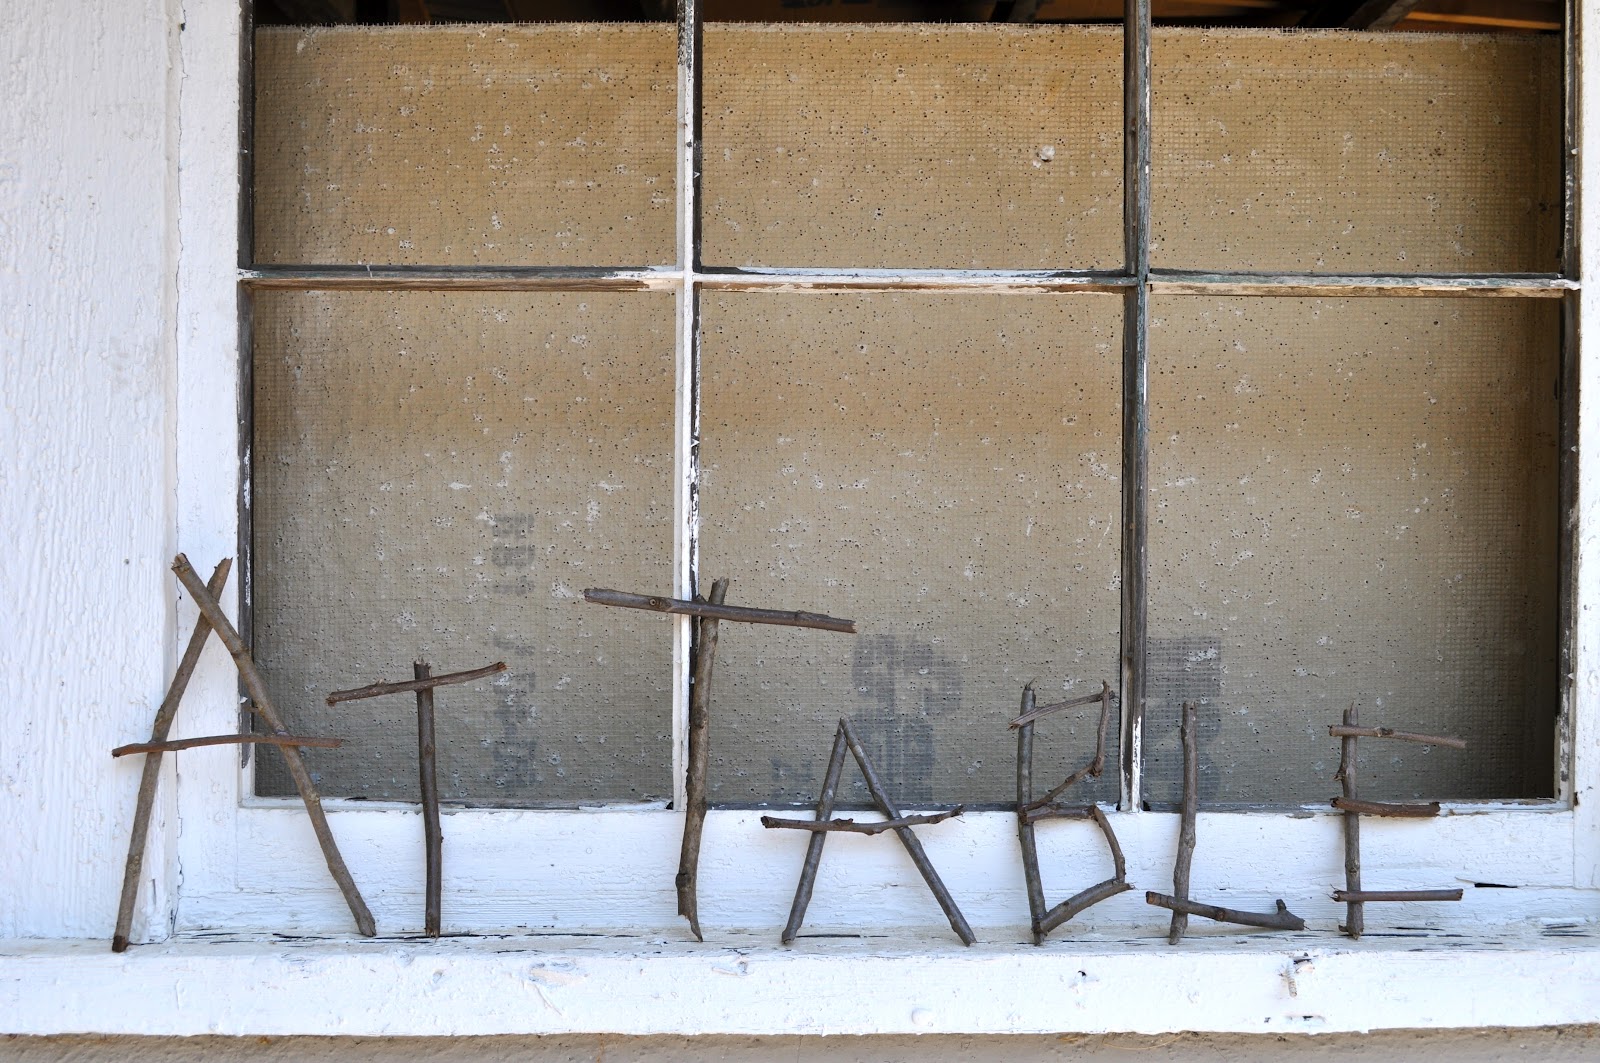
The At Table sign I created a while ago definitely started looking drab to me, so after seeing an idea on Pinterest and in the newest Parenting magazine that magically arrived out of the hands of our postman, I got to work. By the way, I love that the postman walk in our neighborhood to deliver mail!


First, I took the dogs out back and let them prance around while I collected sticks...this didn't take long, since we have a 10 foot pile of limbs and branches sitting at the back of our lot waiting for the city to (hopefully) pick up.


I took my coffee and grabbed my hot glue gun, breaking pieces of twigs apart and arranging them into letters. By this time Finn was up from his morning nap and out to join us.


After arranging and glueing, I set up the words on a window ledge on our little shanty shed (that is soon to be a spiffy garage!) and admired.

Then, I took a break and gave Finn another outdoor bath in the rubbermaid...in the back this time at least! The dogs might have drank out of his bathwater. I still maintain that this is old-fashioned rather than redneck.
After Finn was down for his afternoon nap, I pulled up the rest of a really ridiculous movie called Lost in Austen and got to work painting the sticks.
First, Green Tea(Americana), then Blue Sky(Martha Stewart), followed by a thin line of Deep Sea(Martha Stewart), and to finish it off, Love Bird(Martha Stewart) at the tips.

And there you have it! New life for the words that hold so much meaning in our dining room.

Am I becoming an old lady? This table runner was purchased Wednesday....it is the second embroidered item I've bought recently, and I have countless plans for more embroidery, doilies, etc....woops!
They remind me of what you would create during craft time at a kid's summer camp. And I love that about them. I kind of want my house to look be that, a place where creating happens. Even in a dry macaroni and Elmer's glue sort of way...
Here's a comparison:
These letters would be a fantastic baby shower gift...and SO cheap to make! Just takes a little time and creativity. I want to make a huge one for our back patio that says HOME or something ridiculously sentimental like that.

Read more about the meaning of these words here.

Have a fun weekend!

Allison


4.18.2012

Up off the Counter


One day long ago I went to a thrift store and bought every single metal candlestick they had. At less than $1.00 a piece why not? At the time I had absolutely no idea what I was going to do with them, only that I had just been introduced to the wonders that spray-paint can accomplish so I figured I'd give them new life with color.


Then Pinterest happened (yes, I've had these candlesticks for that long). And when I found this fruit/cupcake tiered stand, I knew exactly what I would use my candlesticks for!
Mary Janes & Galoshes
Here's what my collection had become, minus a few that I've already converted to useful items.

Candlesticks have been a cinch for me to find. The pie tins are another story-maybe I just don't know where to look, and I suppose you can buy them brand new; I've found four without looking too hard, and they've all been purchased at antique or thrift stores. My first step is placing tins on top of sticks until I've found that perfect match up for what I had in mind.

I spray painted the candlesticks a shade of blue, the pie tins I gave a white coat, and then I used an odd sort of metal putty called SteelStik that completely hardens after a while and secured the pieces together. The guy at Lowe's advised me to use this.
This metal glue stuff STINKS. It smells just like this town called Sulfur Springs in Texas that I used to drive through on the way to Tennessee. I was hilariously amused to read the packaging where it stated that this stuff is from none other than....Sulfur Springs, TX! Sorry to anyone out there reading who has a love for this East Texas town...

So here they are, painted, stuck, and dried.

I'd planned to use the big tin to hold hand soap, lotion, and a dish brush to keep next to the kitchen sink. The smaller tin was the perfect size for bar soap for the bathroom sink. 

I also laid a doily at the bottom of the larger tin just for something extra and I found a teensy porcelain bowl for the dish brush to sit in so it'd look fancy and wouldn't drain onto the doily or spray-painted surface.


I love how everything is contained together, just how it would be directly on the counter, only somehow this elevated dish makes it look cleaner....and gives me back that little bit of counter space.

Next, I'm definitely going to make a tiered piece for my jewelry, and eventually I'd love to make something for fruit and to have on hand for little treats or cupcakes at a party. Something like this...

So there you have it, a creative way to get your necessities off the counter but still at arm's length!