


I first got the idea for this project from this picture than I found on Pinterest:
 |
| Via Apartment Therapy |
Right away I knew I wanted to recreate this idea for Finn's room and I already had the perfect door waiting on me in the shed!
So I set to work....first, I power sanded this monster.

Then I used a sponge roller brush and started painting the door with New Avocado by Valspar, the nursery's accent color.

After having a bad run in with magnetic paint(it was one big block of solid, I couldn't stir it worth anything!), I decided to just go for chalkboard paint for the panels. And to make life easier, I taped off each section to get clean lines.
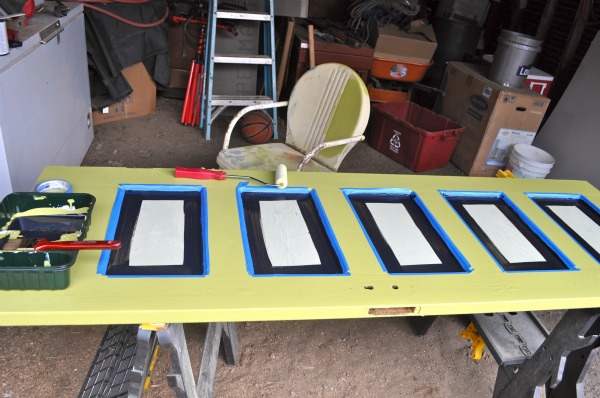
After the painting was all finished, Steven pointed out that there were lots of paint bubbles and that I should scrape them and give it another coat of paint....well, after scraping, I liked the imperfect chipped look, so I decided against throwing on another coat and left it as is. I'd like to think that this had more to do with taste than it did with laziness, but either way!

Then it was time to recruit the husband to do the hard part and hang it up for me!
He screwed two screws into the back, with a heavy duty wire wrapped around each screw.

Then he found the center of the wall and hung the door from its wire on a wall-mounted screw.

Mom and I found these super cute owl hooks from Hobby Lobby, so I had Steven hang those as well..

I love Hobby Lobby, especially for their cheap prices, and these hooks were total Anthropologie knock-offs. I had been eyeing some from Anthro that were about $12 a piece I think. I got these little owls for about $2.99 a piece...however...it is important to remember that Hobby Lobby is cheap for a reason! Both hooks popped straight off these guys as soon as Steven had them screwed on tight..

I guess my husband is just too strong ;)! Well, I'm not too disappointed, you really cannot beat that price, and these are more for looks than function. Maybe a little wood glue? They look alright without hooks too I think.
I had a little fun with the chalk and here's the finished project as of now!

I'm thinking about adding a hanging rod along the bottom for some extra storage, we'll see how much energy I can muster!
After all that Steven needed a nap with Bear...

And Banjo just kept looking as cute and confused as ever!


Lovely job. Sometimes we use two hooks behind to hang a heavy object. Measured about 16" apart to go into studs in the wall. It is a little harder to hang, since you have to find the screws sticking out from the wall, but my husband wants it to hang that way. Cute hooks could be made from other objects, like door knobs, or other hardware recycled. I like the chalkboard paint in there, too.
ReplyDeletethat looks incredible! i love it!
ReplyDeleteThis looks amazing. Maybe you could make one for me! I do have one question about something other than the door. Where on earth did you get that adorable changing pad? Your best of friends? I wish I had such an awesome, cool, suave, handsome, and wonderful friend to give me such a fabulous piece of baby-ware!
ReplyDeleteToo cute! Your little boy will love being able to draw on it when he's old enough (and tall enough?). I wish I could find an old door with perfectly spaced panels like that! :)
ReplyDeleteThis is amazing. I love it. I'm a new follower. Would love for you to stop by http://diyhshp.blogspot.com/ and share the love.
ReplyDelete